
Best Practices when migrating a WooCommerce site to Google Cloud
In 2017, when I first started deploying my software on Google Cloud, I thought of the cloud as a place to run software programs rather than websites. Being an expert in retail solutions, I occasionally integrate my solutions with WooCommerce for online stores. After a while, my clients come back to me with the same complaints that my website is reaching its capacity and becoming unreliable. The reason for this is that I use shared servers while working on simple projects like WooCommerce.
It reaches a point where shared servers can no longer support the transactions on your website.
After installing a number of WooCommerce solutions on the cloud, I’d want to share some lessons with anyone thinking about migrating their website to the Google Cloud.
How do you tell whether it’s time to switch to the cloud?
I’ve had a few websites with over 1000 products and over 3000 monthly views. However, when traffic and sales exceed this threshold, shared servers become overburdened.
Now that I know I must migrate to the cloud, who is the best cloud provider?
In my 5 years of interacting with cloud providers, I’ve observed that the majority of them provide similar services. What matters most is how quickly you can learn the concepts and apply them. Understanding the platform will allow you to save money while improving the performance of your website.
As a result, rather than focusing on the price, my advice is to concentrate on how quickly you can learn and comprehend the platform.
I’ll now walk you through the technical steps for migrating a WooCommerce website to Google Cloud; most of these steps apply to all cloud service providers.
Start by visiting the google cloud console https://console.cloud.google.com
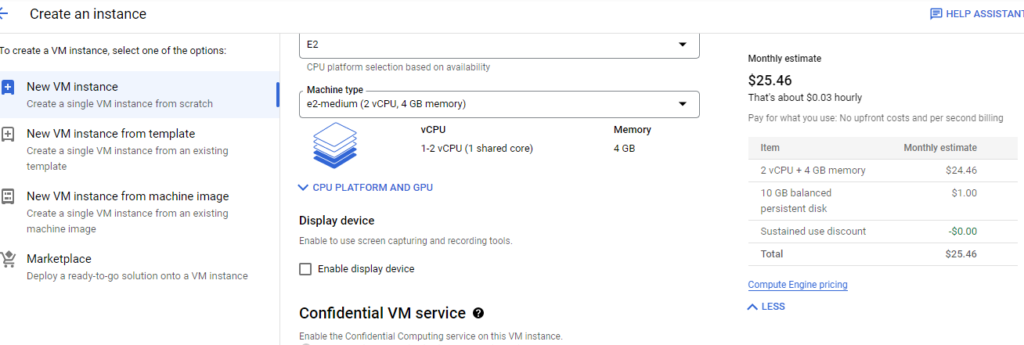
Setting up your server on Compute Engine
You will need an actual server to run your website, I’m a fan of CentOS so my code samples will be Debian based.
Go to virtual machines and configure your server according to your needs, most likely the defaults will work for you
Now ssh to the server and let’s begin the actual job
Installing PHP 7.4 on CentOS 7 and configuring apache for WordPress
sudo yum -y install http://rpms.remirepo.net/enterprise/remi-release-7.rpm
sudo yum install yum-utils
sudo yum-config-manager --disable remi-php54
sudo yum-config-manager --enable remi-ph

# replace the index page
sudo mv /etc/httpd/conf.d/welcome.conf /etc/httpd/conf.d/welcome.conf.bk

# install dependencies
sudo yum install httpd mariadb mariadb-server php php-common php-mysql php-gd php-xml php-mbstring php-mcrypt

# Managing httpd service
sudo systemctl restart httpd
sudo systemctl enable mariadb
sudo systemctl start httpd

# install phpmyadmin
yum -y install phpMyAdmin

#configure phpmyadmin

sudo vim /etc/httpd/conf.d/phpMyAdmin.conf

sudo systemctl restart  httpd.service

# CONFIGURE VIRTUAL HOSTS
/etc/httpd/sites-available/example.com.conf


<Directory /var/www/html/example.com/public_html>
#add the following setting to allow .htaccess in your web dir to work
     AllowOverride FileInfo
    Require all granted
</Directory>
<VirtualHost *:80>
    ServerName examples.com
    ServerAdmin root@localhost
    DocumentRoot /var/www/html/example.com/public_html
    ErrorLog /var/www/html/example.com/logs/error.log
    CustomLog /var/www/html/example.com/logs/access.log combined
</VirtualHost>


#CREATING A SOFTLINK
sudo ln -s /etc/httpd/sites-available/example.com.conf /etc/httpd/sites-enabled/example.com.conf

#ENSURE ALL FILES ARE OWNED BY APACHE:APACHE
sudo chown apache:apache -R /var/www/html/example.com/


# ENSURE THE SITE CAN SEND EMAILS
$ getsebool httpd_can_sendmail
$ sudo setsebool -P httpd_can_sendmail 1


# Load balance with ssl
File: wp-config. php

define('WP_HOME','https://www.example.com');
define('WP_SITEURL','https://www.example.com');
$_SERVER['HTTPS'] = 'on';

# Make sure you enable soap client
# Check if soap client is enabled
php -m | grep -i soap
sudo yum install php-soap
Migrating files from the previous host
Having configured the server you now need to bring your files from your previous host, the easiest way is first to upload files to the google cloud bucket.
Go to google cloud storage then create a bucket depending on the size of your files

Moving your files from the google cloud storage bucket to your Virtual machine
# download file from cloud bucket
sudo gsutil cp gs://bucket-url/filename.zip .

#install unzip function
sudo yum makecache
sudo yum install unzip

# Unzip the downloaded file

sudo unzip filename.zip

# Move the file to public_html

sudo mv path/to/file path/to/destination
Configuring the database
Export the database from your previous site then upload it to your new server.
mysql -u root -p

# Enter password

CREATE DATABASE db-name;
CREATE USER user@localhost IDENTIFIED BY "password";
GRANT ALL ON llslive.* TO user@localhost;
FLUSH PRIVILEGES;

# restore db
sudo mysql -u root -p  db-name < db-file-name.sql
You will need to set up Google Cloud Load Balancer
The HTTPS load balancer will allow you to create a backend service that will be used to send traffic to your server. For you to configure the load balancer, you need to set up an instance group first, while configuring the instance group use the virtual machine you configured in the earlier step. While setting up the backend service make sure you reserve the IP Address and set up the SSL certificate.
After setting your load balancer, go to your web host and create an A record from your DNS records, it should point to the IP Address of your Load balancer.
Ensure your firewall rules are in check
- Open SMTP & HTTPS ports using the firewall rules
By following these guidelines you will be able to successfully migrate your WordPress website from a shared server to google cloud.
Thank you for taking the time to read my blog, see you in the next article.